The goal of this tutorial is for each student to create a basic WordPress site to share your work on the public web. This tutorial is designed for students who have already requested an account on the Trinity Commons platform at http://commons.trincoll.edu, which currently runs WordPress v4.8 (note that WordPress v5 editor is very different).
Sample sites on Trinity Commons platform:
- http://commons.trincoll.edu/erollins
- http://commmons.trincoll.edu/edreform
- http://commons.trincoll.edu/jackdougherty
Overview of sections below:
- Reminders
- Login
- Dashboard
- Link
- Image
- Video
- Visual vs Text editor
- Pages vs Posts, and Set Front Page Display
- Modify Theme Appearance with Customizer
- Modify Menu
- Wide view
- Footnote
- Table
- iFrame
- Create Anchor Links for Long Pages
- and more to come
Important reminders:
- Content you publish on your WordPress site is public, meaning that anyone can search and read it. Read this class policy on public writing and student privacy.
- You control your content, and can delete items after they have been graded. How many students use their full names and keep their work public after the semester ends? See my book chapter.
- We are limited to WordPress themes and plugins that available on the Trinity Commons platform. See more options below.
- You will have “administrator” access to your site, but you may lose login access after graduating from Trinity. See more options below.
- If desired, you can export your site content from Trinity Commons, and upload it to a web-hosting service, with option to choose your own domain name:
- See http://WordPress.com pricing ($0-$25/year), but lower-cost includes advertisements; does not support same features as self-hosted WordPress sites like Trinity Commons platform (such as iframes); limited support
- See http://ReclaimHosting.com for more features, domain name, and excellent support at $30/year.
Login to your Trinity Commons site
- Login to your site at http://commons.trincoll.edu
- OR go to YOUR site and scroll down front page to Meta > Login
- OR go directly to YOUR site login page by adding “wp-login.php”
- my direct login: http://commons.trincoll.edu/jackdougherty/wp-login.php
- Login with your Trinity network username and password (same as email)
WordPress Dashboard: Add Page, and Visit Site
After you have logged into your account, explore these features of the Dashboard (back end):
Pages > All Pages. Create a new page, add a short title and text, and Publish.
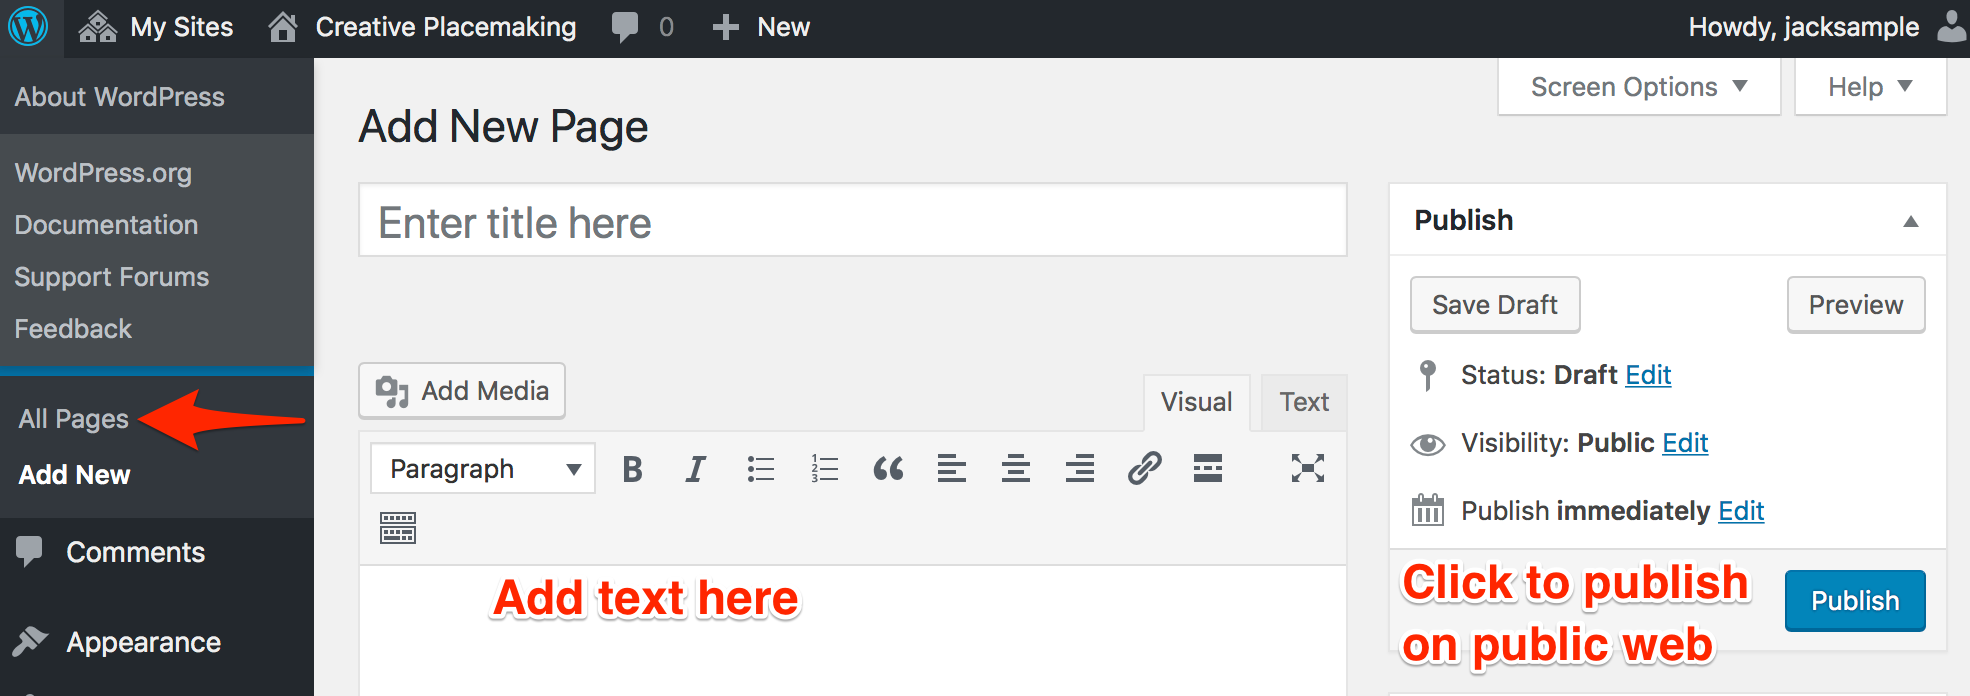
Float mouse over home symbol/site name and control-click to open “View Page” or “Visit Site” in a new tab. This allows you to make edits on the back end (Dashboard) and view changes on the front end (your public site). Always refresh your front-end browser tab to see the latest updates.

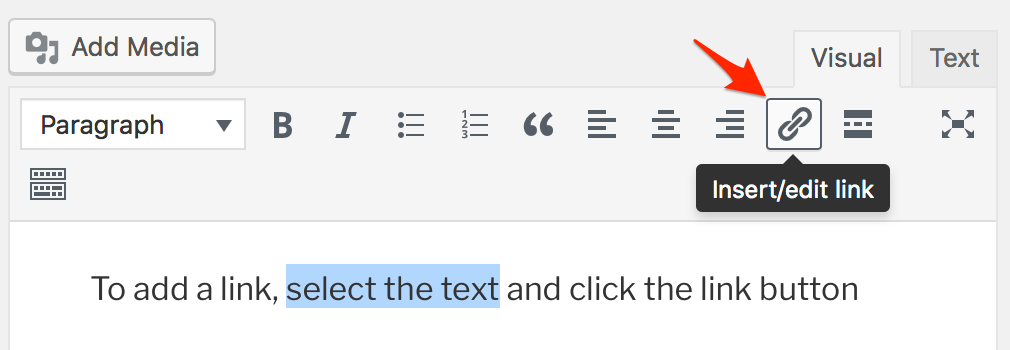
Add link
Inside your page editor, select text, click the link (chain) symbol, and insert web address
Add Image
Inside your page editor, insert the cursor where you want the image to appear, click Add Media button, and select the image file (JPG or PNG or GIF). Add a title and caption and provide the source credit (and link). Remember that if you insert an image in academic work WITHOUT source credit, that is a form of plagiarism.
If you need to capture a screenshot of an image from your computer screen:
- Mac computers: hold down SHIFT-COMMAND-4; or download Skitch tool
- Windows: Start Button > All Programs > Accessories > Snipping Tool
See instructions for other devices at https://en.wikipedia.org/wiki/Screenshot
Add Video
Insert a YouTube or Vimeo URL directly into the page editor, like the one below, and it will automatically appear as an embedded video:
https://youtu.be/Gl3uIRYYUmI
See the result below. Remember to type a caption with source credit (and link) directly into the text below the video, since there is no caption box (as there are for media images).
Video by the Liberal Arts Action Lab (2018)
Embed PDF
The Trinity Commons platform offers the Google Doc Embedder plugin (which is poorly named because it displays more than Google Docs). To display your PDF file as an embedded scrollable image in your WordPress page. If you have a copy of the PDF file:
- Upload the PDF to your WordPress Media Library, similar to an image
- In the Media Library, click the PDF icon to open its properties
- Copy and paste the long URL to the uploaded PDF file, which will look like this:
http://commons.trincoll.edu/jackdougherty/files/2019/02/sample.pdf - In your editor, type this bracketed “gview shortcode”, and insert the long URL pathname to your PDF file. It should look similar to this:

See embedded sample PDF result below.
Visual vs. Text editor tabs
Click the WordPress editor tabs to toggle back and forth between the “Visual” view (what you see is what you get) versus the “Text” view (the code underneath your page). To fix some problems, you may need to work in the “Text” tab to clean up small issues.

Pages versus Posts, and Set Front Page Display
WordPress displays two major types of content:
- Pages – for more permanent content, easier to find in menu
- Posts – for most recent content, with newest at the top
You can design your site to show only Pages, or only Posts, or both.
Go to Dashboard > Settings > Reading to determine if your website front page will display:
- Your latest posts, OR
- A static front page (created by you, with a title such as “Home” or “About”), with the option to display posts on another page (also created by you, titled “Posts” or “News” and simply serving as a placeholder for the newest Posts you create).

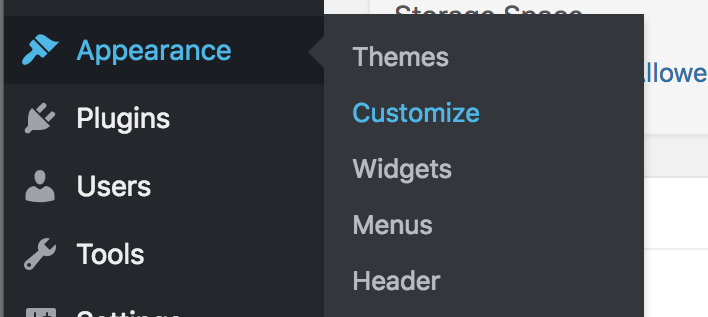
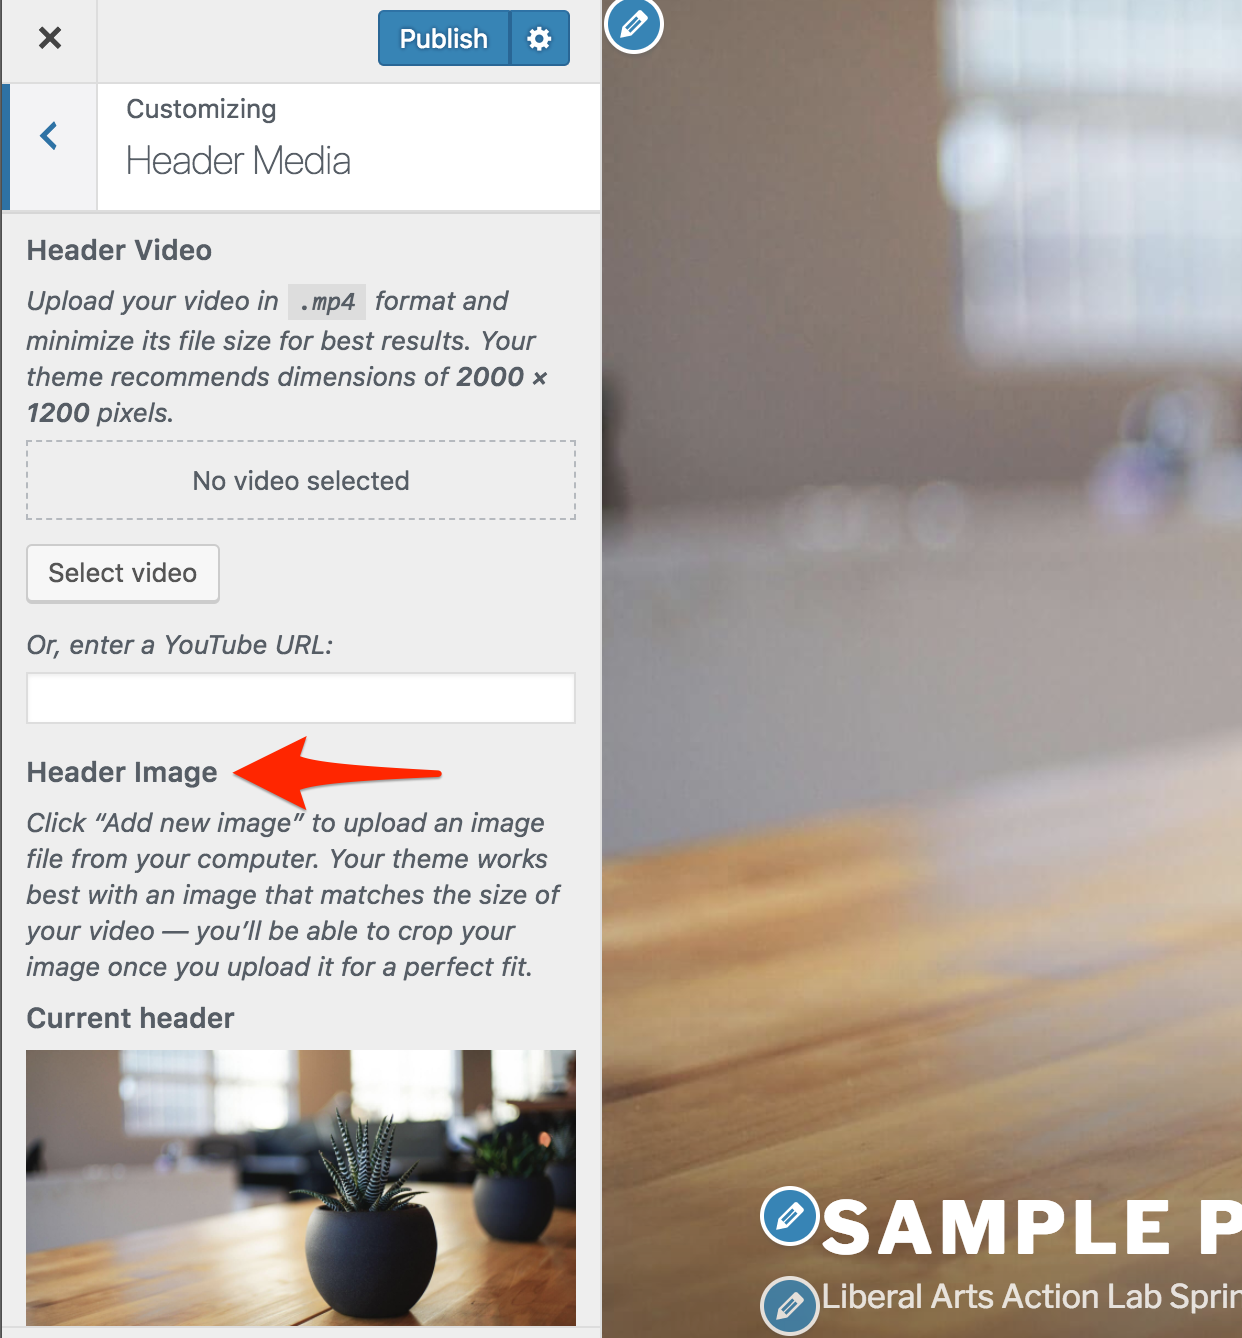
Modify Theme Appearance with Customizer
The Trinity Commons default WordPress theme is titled Twenty Seventeen, which is a responsive theme (automatically resizes to small devices or large screens) that beginning users can easily modify with the Appearance > Customizer tool. Read more about the theme features at https://codex.wordpress.org/Twenty_Seventeen
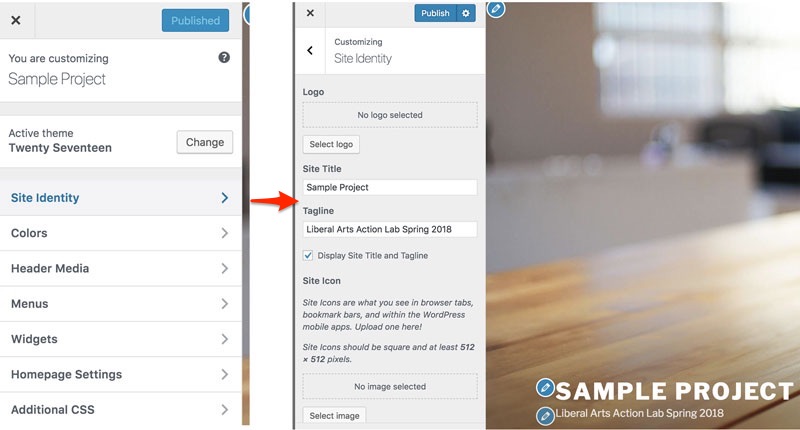
In the Customizer, select Site Identity to change the header or tagline text. Click the blue Publish button at the top to save your changes.
In the Customizer, select Header Media to upload a different image. Recommended images must be high-resolution: at least 2000 pixels wide by 1200 pixels high. You will be given the option to crop a larger image on upload. In theory, you could upload a header video via YouTube, but internet speed issues often produce a less-than-desirable outcome. Stick with images. Click the blue Publish button to save changes.
Modify the Menu
In the Customizer, select Menus to organize menu items on your front page. Select Create New Menu, choose its location (Top Menu), and give this menu a name (such as Top). Then click Next to Add Items to your menu, such as Pages (which you created above) or Custom Links (to point to an external web site).

Click items to add them to your menu, and reorder with drag-and-drop, then Publish to save changes.

Set TwentySeventeen pages to wide view
By default, the TwentySeventeen page view is narrow. To set to wide view:
- Appearance > Customize > Home Page Settings > Select a Static Page
- In Customizer, a new submenu will now appear: Theme Options
- Theme Options > 1 column (for wider view, rather than 2 columns)
Insert a Footnote
Trinity Commons offers the Simple Footnotes plugin (go to Plugins > Activate). To insert an interactive footnote after your main text, wrap the note text inside bracketed “ref shortcodes,” similar to this:

Your text will appear as shown in the demo below, with a footnote number automatically displayed. Float over the cursor to see the note in a tooltip, or click to view the note at the bottom of the page.
Here’s the main text. 1
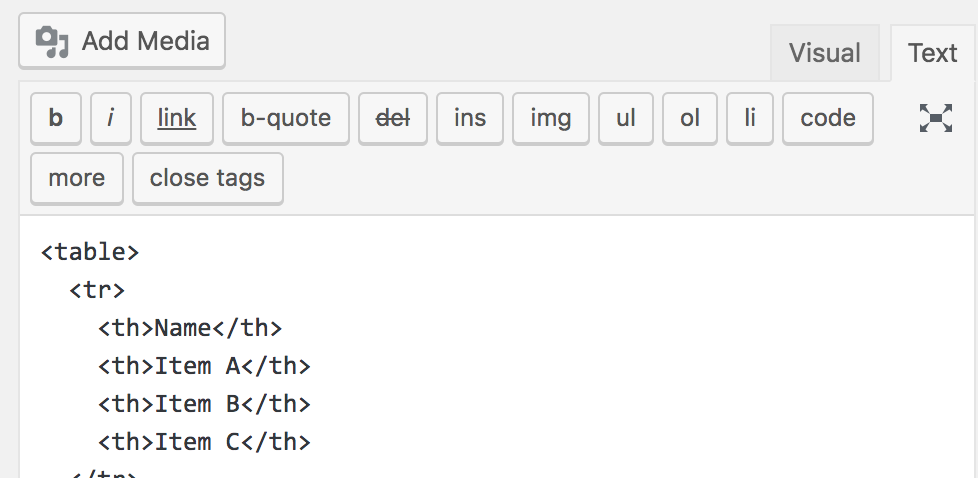
Insert a Table
If you need to insert a table into WordPress, one quick option is to capture a screenshot of a spreadsheet (see above). But a better option is to generate the table in HTML code and paste into the WordPress text editor.
- go to http://tablesgenerator.com/html_tables
- design your table and type in content
- click the box: Do Not Generate CSS (to simplify the display)
- generate the table and copy the HTML code to your clipboard
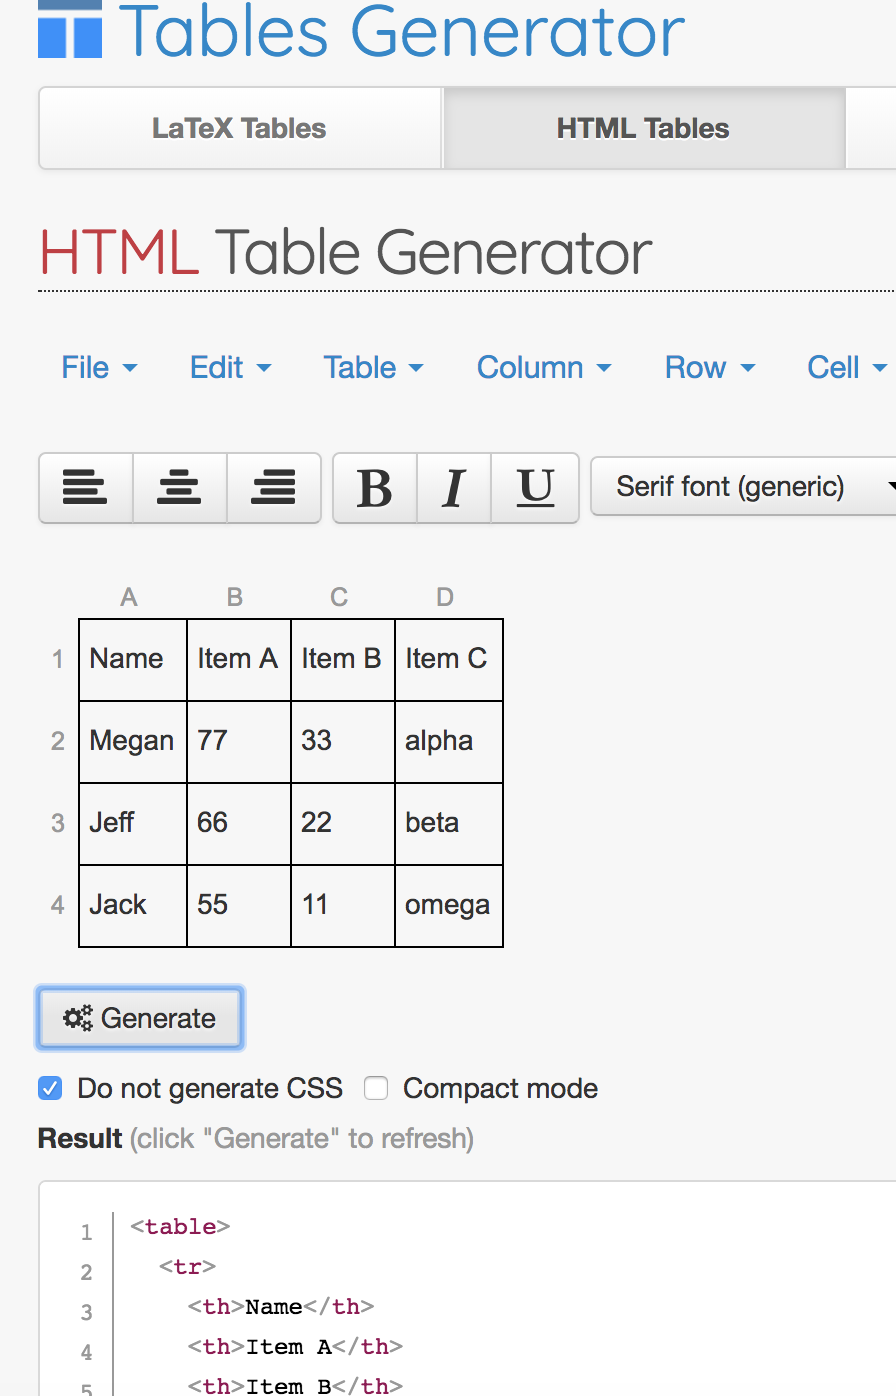
Finally, in your WordPress editor, click the Text tab (next to the Visual tab), and paste the HTML code.
Your table will appear similar to the one below.
| Name | Item A | Item B | Item C |
|---|---|---|---|
| Megan | 77 | 33 | alpha |
| Jeff | 66 | 22 | beta |
| Jack | 55 | 11 | omega |
iFrame interactive charts and maps
Trinity Commons offers the iframe plugin (go to Plugins > Activate) to display an interactive web page from one site (such as an interactive chart or map) inside your WordPress page or post. Learn more about the iframe concept at https://datavizforall.org/embed.html
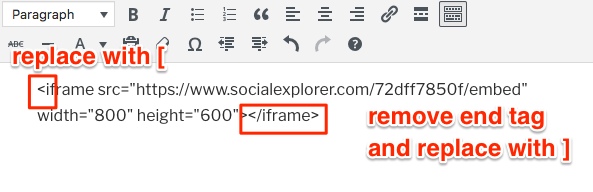
Copy the iframe embed code for your interactive chart or map. For example, see this screenshot of the embed code for a Social Explorer map:
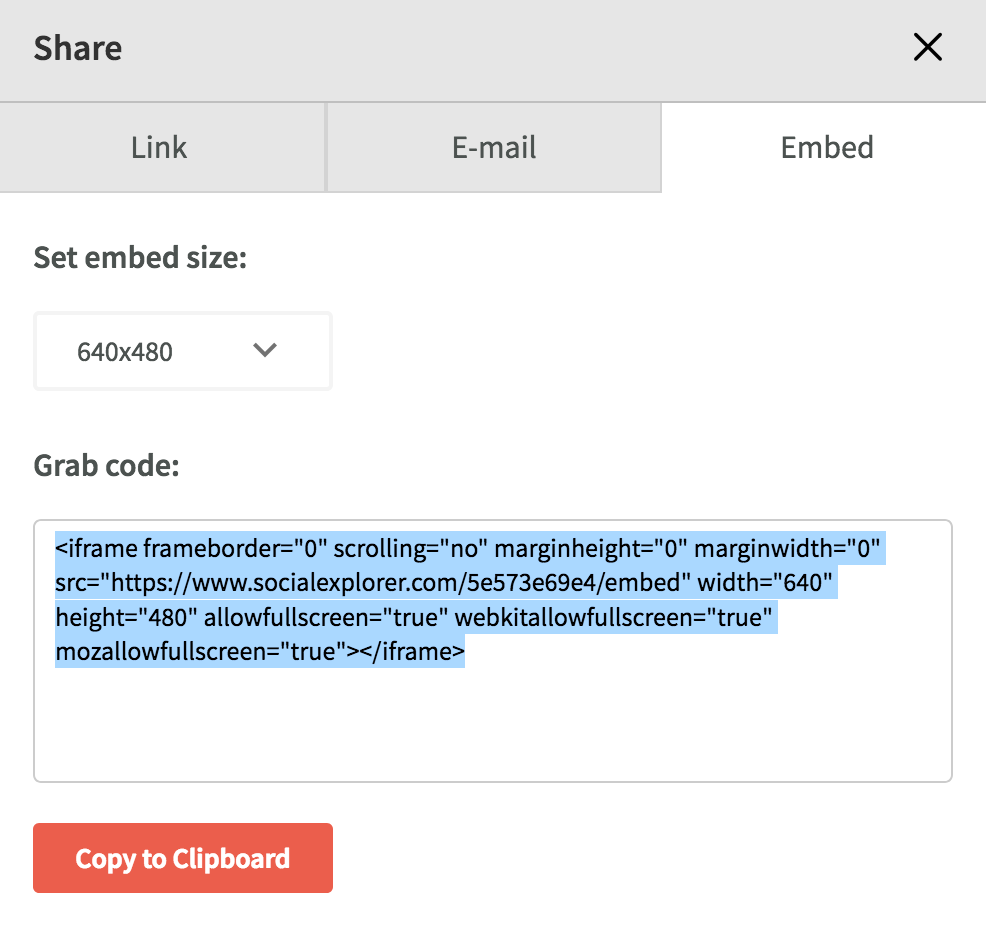
Paste the embed code into your WordPress editor window, and modify the iframe code as shown below:
- At the front end, replace the less-than symbol
<with an open bracket:[ - At the back end, remove the entire iframe end-tag, and replace the greater-than
>with a closed bracket:]
Your modified iframe code should appear similar to the image below:
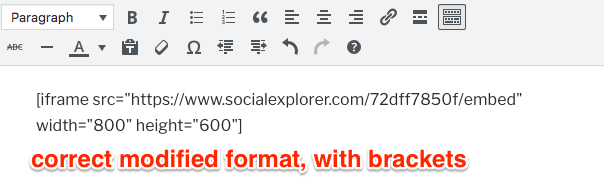
Your iframe may contain some optional elements (such as frameborder, marginwidth, scrolling, etc.) The only required elements are the src (source url), along with the width and height (in pixels or percentage, such as “100%”). This means that you can also embed an interactive chart or map from another URL inside your WordPress site.
The end result should look similar to this embedded interactive map:
Create anchor links to navigate long pages
If you have a long web page, consider using anchor links at the top (similar to Table of Contents) to point readers to specific sections further below. For example, the “Overview” of sections at the top of this page uses anchor links. To add these to your site, see author’s instructions at https://epress.trincoll.edu/webwriting/chapter/how-to-publish-on-wordpress/#anchors
Notes:
- Here’s the footnote text. ↩