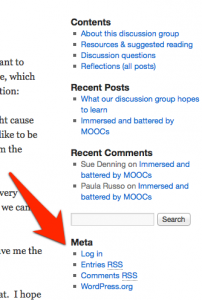
Trinity Banter (http://commons.trincoll.edu) refers to the WordPress platform hosted by the College, which allows all of us to easily post content to the public web. Scroll down the menu to Log In to our site:
In the Dashboard, the most important menu items are:
- My Sites – to select a site and visit its front-end (public) or back-end (Dashboard)
- Posts – to add new content or edit existing posts
- Profile – to modify how your name displays on your site, and to add biographical info
In your Profile, add your first and last names, and choose how you wish your name to be displayed on the public web.
Add New Post to open the WordPress editor, add a descriptive title, and type or paste in your content. Click “Preview” to see how it looks. Click “Save Draft” while working on your post, and “Publish” when it’s ready to appear on the public web. Each participant has author-level access, so published posts will automatically appear on our site’s front page.
To add links to text in your WordPress editor, select the text and click the link button.
 On the next screen, insert the destination of the link and add a simple title. If the link points to an external site, and you would like readers to easily return to your site, click the box to “Open link in a new window/tab.”
How to add images to your WordPress post:
Capturing an image from your screen (aka a screenshot) may help to illustrate a key point in your writing. To create a screenshot on a Macintosh, do ONE of the following:
- Shift + Command + 4, or
- Applications > Grab, or
- download free application Skitch
To create a screenshot on Windows, do ONE of the following:
- Print Screen button, or
- Accessories > Snipping Tool (Windows 7)
When uploading any image (such as a screenshot or photo) to your WordPress post, follow copyright guidelines and credit images to their original source.
In the WordPress editor, place the cursor in front of the relevant text, and click the upload/insert media button.
On the Add Media screen, drag & drop your image file into the box, OR click the “From URL” tab if the image already exists elsewhere on the web, OR click “Media Library” if you have previously uploaded the image to your site.
At the bottom of the Add Media screen, add a caption (especially to credit the original source), choose alignment and size, and click “Insert into post.”
Remember to log off when finished:
To learn more about Trinity’s WordPress platform, see the Getting Started support page, or my How-to Tutorials & Digital Tools page.


