CT Landmarks project final slides and transferring of ownership

Posted on

Laura will edit the first and last slides later this week to add her presentation part to it.

Assignment 10B: Write a transfer and training plan to migrate your dataviz and ALL source files to your partner.

  • Which files need to be transferred? How are they labeled? Who owns or has access to them?

The journal files scanned(in PDF format) were all in Community Partner’s local hard drive and their official Google Drive, labeled in their labelling format. The pictures of artifacts I took were not in their system yet, and I will transfer all the pictures to our shared Google Drive(owned by CT Landmarks) before finals.

  • What info and training does the partner need to maintain or update the dataviz? Spell out the steps in your post, and refer to DataVizForAll if needed.
  1. Go to http://storymaps.arcgis.com/en/  , and log in.
  2. Click “My stories” in the upper panel, and go to the current story.
  3. Add Point to the map:
    1. Screen Shot 2016-04-19 at 21.50.40
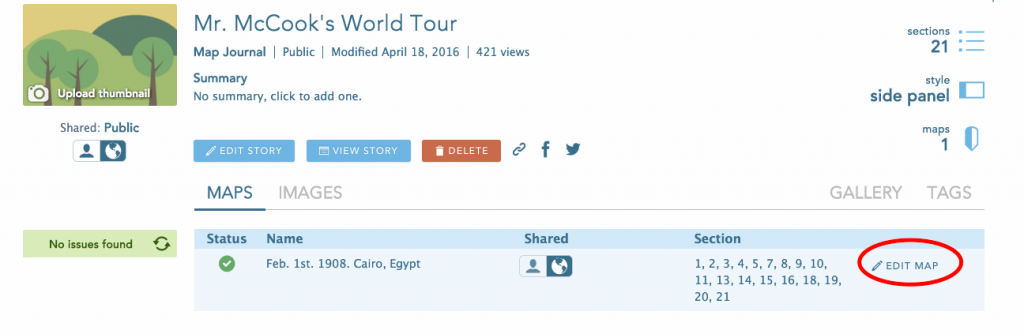
Select the map in use, click on “Edit map”.
    2. In the new window, search for the location in the search panel on upper right corner, Then in the small frame popped up, click on “Add to Map Notes”. Then a pinpoint will be created
    3. If you need to add any additional informationAfter added to map notes, click on the pin again, then click “edit” in the pop-up window.
    4. Click “Save”, and go back to the original story map page.
  4. Delete point on the map:
    1. Click on the pinpoints, and click “edit”, then in the new menu, click “Delete”.
  5. Edit Any part of the Story:
    1. Click on “Edit story” in the storymap dashboard(The pic shown above)
    2. Scroll down to the part you wish to edit, and then click the small pencil icon associated with it.
    3. Main-stage (The background) SetupScreen Shot 2016-04-19 at 21.58.54
    4. Side Panel content editScreen Shot 2016-04-19 at 22.06.37
  6. Create a new point for a story
    1. Click the “+” sign at the bottom of the side panel, and follow the procedures for editing the story(Step 4)
  7. Organize the orders of the pinpoints:
    1. Click the “Organize” sign at the bottom of the side panel, and drag-and-drop pinpoints in designated order

Laura and I will meet in person in the next following weeks to do all the trainings for ArcGIS.

My Demo of the project

Posted on

Link to the demonstration:
Map tour demo

I have already embedded my story map into my partner’s website. There are only 3 pinpoints on the map now, and we wish to have 30 pinpoints for our final project. Each pinpoint will consist of introductory paragraph, quotes, and pictures. Some pinpoint will also show artifacts and 3D models. The final project will be a live story of Mr.McCook’s around-the-world journey. We wish the story map to be easily editable, and we will also produce a text-and-picture only paper form interpretation of the tour for further use and updates.

Steps I have completed:
0. All the scanning of McCook’s journal and sorting of files.
1. Create a storymap, and add contents to it.
2. Figure out how to embed 3D models without killing the application.
3. Write several intros to the pinpoints.
4. Figure out how to export data through the story map(which was once thought as impossible).
5. Create the website and embed my map to it.
6. Update the original data document corresponding to the map.

Steps yet to be done:
1. Finish all the readings of the journal and write intro to all of them(estimated time of completion: next week)
2. Add all contents to the storymap demo version(estimated time of completion: mid-April)
3. Figure out how to edit the style of the pointers on the map, b/c now the pointers are hardly visible(this can only be done through github code editing, so that I will have to have host server for the website, which make this seemingly-simple mission extremely hard. I will try to do that after I finished the demo version).
4. Follow-up with my partner frequently to update the data I have(Some necessary pictures still need to be added)
5. Introduce my partner to the ArcGis tool, and let her know how to update in the future.
6. Present the work before final.

Github modifying–Leaflet storymap

Posted on

https://github.com/shuxinzhang/leaflet-storymap/tree/gh-pages

In this sample I modified several locations and added text, pics in the Geojson file to try to tell an around-the-world tour story. Upon several comparisons I would use Arcgis’s template and their open-source code in Github to modify my project.

Lying with map–the inequality in median household income in CT

Posted on

Map with little difference:


Map shows significant difference:


In the first map, I selected a very broad difference range in the legend, 50000-150000, so that most counties’ median household income fell between this range. As a result, on the map little income difference among counties are shown. People who view the first map on the first glance will think Connecticut as a state with very low income inequality. In the second map, I reduced the difference range and select 70000, 100000 as critical point on my map. As there are many counties whose median household income is less than 70000, and there are many counties with median household income greater than 100000, the map shows a significant income difference among CT counties.

Comparison of 3 mapping tools

Posted on

Sample Lunch Data in MapMe:

Sample Lunch Data in Google Fusion Table:

Sample Lunch Data in Batchgo:


Reflections and thoughts:

Speaking of simplicity, the easiest tool to create a map is definitely BatchGo. Its Geocoding strategies is very efficient and smart, although there are no commas in my original address data and the zip codes are missing 0’s, BatchGo still did the job and recognized the addresses in less than one second. Google Fusion table caused less confusion to me than MapMe did. Some alteration on the address need to be done in order to be recognized, since FusionTable can only grab address data from one block(while BatchGo can grab address data from multiple columns at a time), and the address must correctly match the format. MapMe had a even more strict restriction on formatting the data. It need the user to insert data in certain models, or it won’t recognize it. But if the data is formatted correctly, MapMe geocoded without trouble.

Speaking of features, I personally love MapMe over the other two tools. Mapme allowed me to insert multiple images associated with the location, and can let the user easily view locations one by one. Both MapMe and BatchGo sorted the locations by type automatically, and allowed me to change the colors and icons of the location by groups. FusionTable did a weaker job on sorting. However, BatchGo limits the information that I can change on each location(only the basic address and links, I cannot find a way to add descriptions on individual location). FusionTable and MapMe all provided flexible info-displaying features.

The portability of the three are almost the same. They can all be easily embedded by iframe, and all the three tools provided html code and links.