DataViz Final – CWP Project

Posted on

Files to be transferred:

  • The geojson file for the 37 towns. Label: cwp-37-towns-v8.geojson. This file contains the data provided by the Capital Workforce Partners. The organization owns and has access to the file.
  • The csv file for 37 towns. Label: cwp-37-towns-v8.csv. This file contains the data in the geojson file but in the excel format.

Part 1: Maintain the website

  1. Sign up for a free GitHub account.
  2. Go to https://github.com/ngocdo67/cwp-map. This is the repository for the Leaflet map. Click on “Fork” to make your own copy of the map.Screen Shot 2016-04-21 at 11.09.00 AM
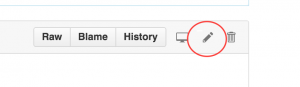
  3. Go to the README file. Click on the edit icon. In the demo link http://ngocdo67.github.io/cwp-map/index.html change “ngocdo67” to your github username. Click on the green button Commit changes.Screen Shot 2016-04-21 at 11.33.08 AM
  4. Go to the branches tab. Delete all branches, except for the master branch. Go back to the repository main page. Click on Branch: master. On the Find or create a branch, type in gh-pages to create your own gh-pages branch. The code in here would be the one that goes live on the link you have on the README file.Screen Shot 2016-04-21 at 11.35.08 AM
  5. Replace the current link on your account with your own demo link.

How to do a pull request

  1. On the main page of the repository, click on the green button New Pull Request

Make sure the base fork is your username, NOT “ngocdo67”.  Use the drop-down menus to CAREFULLY select the direction of the merge in this TO-FROM format. In this example, it is TO master branch FROM gh-pages branchScreen Shot 2016-04-21 at 11.38.31 AM

  1. Follow these steps to finish the pull request, which merges all content TO the master branch FROM gh-pages branch:
  • Create the pull request (select green button)
  • Give it a title (such as “updated index and ReadMe”)
  • Send pull request (green button)
  • Merge pull request (another green button)
  • Confirm merge (and another green button!)
  • Always double-check your repository branch names to do editing and live web testing in the gh-pages branch, then make sync a copy to public share in the master branch.

Part 2: Update the Information

  1. On the main page of the repository, download the zip file. Open the compressed file.
  2. Open the cwp-37-towns.csv file in the zip. The column number corresponds to the tab number. For example, number 2 means Median age. Change the data and save it as a new csv file

Solution 1: Mapshaper

  1. Import the geojson file to mapshaper.org by dragging the file to the site’s browser window. Click on the i icon and hover over (NOT clicking on) the map to check if the field that contains towns’ names is named “name”.                       Screen Shot 2016-04-30 at 2.16.45 PM
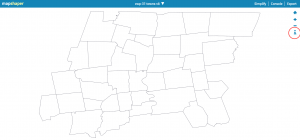
  2. Import the new csv file to mapshaper by dragging the file to the site’s browser window. When a window pops up, select the Import button to add the csv file as a second layer. This table layer will appear as a rectangular cells, because it does not contain geographic information.mapshaper-join-select-map-layer
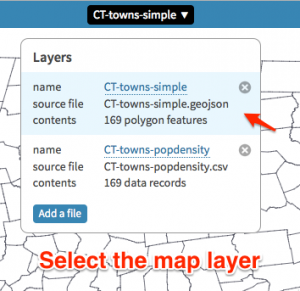
  3. Click the drop-down menu and select the map to display it as the active layer
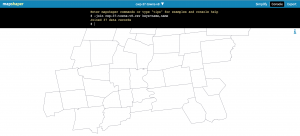
  4. Click the Console button, type this command( -join your-new-csv-file-name.csv keys=name,name) and press return Screen Shot 2016-04-21 at 11.46.15 AM
  5. Click the Export button, select the GeoJSON option to download your new GeoJSON file.

Solution 2: geojson.io: If the merge fail in mapshaper, you can go to the page geojson.io to fix the data manually

  1. Go to the website geojson.io. If there already exists a file on the website, click New. Click Open and select File to upload your geojson file.
  2. On the right side of the website, select the Table tab. In here you could directly change the data in that table.Click Save and select GeoJSON to download the new geojson file to your computer.
  1. Click on the New pull request to see if the master branch and gh-pages branch are similar or not.
  2. If there is any difference, then do a pull request from gh-pages to master branch.
  3. Upload the GeoJSON file to the master branch by clicking the Upload button on the main repository page. After dragging the new GeoJSON file to the browser, click the green button Commit changes.
  4. Do a pull request from master to gh-pages branch
  5. Go to script.js in the gh-pages branch. Find the line  $.getJSON(“cwp-37-towns-v4.geojson”, function (data) and change “cwp-37-towns-v4.geojson” to the name of the new geojson file. Click the Commmit Changes button.
  6. Go back the the main page of the repository. Do a pull request from gh-pages to master branch.

Delete a Repository

Screen Shot 2016-04-27 at 10.30.11 PM

  1. On the main page of the repository, go to Settings.
  2. Click on Delete this Repository
  3. Type in the name of your repository to confirm that you want to delete it.

Reference: Data Visualization for All – Jack Dougherty


Demo in Progress

Posted on

Link to project (still in progress): http://ngocdo67.github.io/cwp-map/

My partner’s goal for this project is to create an interactive map of the region, which consists of 37 towns and cities in Connecticut. The map would have five tabs regarding the following information: number of people served, median age, median household income, poverty, and unemployment rate. For each tab, when the users hover the mouse over each town, they would see the key data points in the information window. On the other hand, when they click on each town, the link that leads to the PDF file containing that town’s profile would pop up. The first tab, which shows the number people served, would be the default tab that appears on the organization’s website. This would be the only tab in which all the towns are colored yellow. In the other four tabs, the colors for the towns would be different shades of yellow  from light to dark depending on the data of that town. Furthermore, the project should be sustainable, which means that the data should be easy to update and there should be detailed instructions on how to do so.

Steps I have completed:

  • Discussed with my community partner to present the available options and understand their preference
  • Created multi-tabbed Leaflet map of the region
  • Created the map so that users can hover and click on the towns for information
  • Created the data file for the first four tabs
  • Tried different fill colors for the map

Steps to be done:

  • Insert the data of the fifth tab into the map once I receive the data
  • Decide on the appropriate fill color for the map
  • Calculate the break between ranges of colors for the multi-colored maps
  • Minor changes in the information window and reference at the bottom of the map
  • Write a detailed instructions on how to update the data
  • Create a legend for the map

Modifying Leaflet Map Code

Posted on

My data visualization is a map, which is still in progress, about the number of adult served by my community partner, the Capital Workforce Partners. By modifying the code from the sample project of Professor Dougherty, the instructor of the class, I created a Leaflet map of 37 towns served by Capital Workforce Partners. The number of people served is shown in the information box in the top right corner when the user hovers the mouse on the map. When a region is clicked on, a small information window with a link to the town profile pops up or it will directly go to the town profile. This feature is subjected to change.

Lying with Maps of Total Adult Served by Capital Workforce Partners

Posted on

The two maps above show the total adults served by my community partner, the Capital Workforce Partner. For both maps I used gradient of purple to fill in the polygons, because the gradient can illustrate difference in quantity of the same data type, which in this case is the number of people served. While the first map emphasizes sameness, the second one highlights extreme inequality. For the first map, I narrowed down the ranges for the towns with lowest and highest number of people served. As the range of the medium number of people served are very wide, almost all towns fall into this category, which creates a sense of equality. On the other hand, for the second map, I expanded the range for the high and low number of people served. This creates more disparity among the towns. The towns in the middle of the state, such as Hartford have high number of people served, whereas many towns in the boundary still have not many people served. Hence, by changing the range of number of adult served, I can make two contrast maps of the same data, one emphasizes sameness, while the other highlights inequality.

Comparisons of 3 Mapping Tools

Posted on

Google Fusion Table

BatchGeo

MapMe

After creating point maps of sample lunch data on three different tools, I have learned that BatchGeo is the easiest to use, while MapMe is much more flexible, and Google Fusion Table is the middle ground of the other two.

In less than five minutes, I could create a nice map on BatchGeo by copying the data on the website. However, the downside for this is that I did not have the chance to customize my map. The info windows are fixed, and I cannot change the point size and display. Therefore, BatchGeo is recommended for people who need to make a simple map quickly.

On the other hand, MapMe offers users many choices of map display. I could customize the info windows and symbols for the points on the map. I could decide the map type and even upload a map logo. There are also more tools, which I hope to learn more in the semester. Unfortunately, MapMe is not very user-friendly and efficient. The tool is rigid in terms of importing data. The website did not allow me to create a map until all the locations in my data are formatted correctly. So I had to add one address at a time. Though adding an address is not hard because the site suggested the right location very quickly, this will not be efficient if I’m working with some data with many addresses. Thus, MapMe is suitable for those who want a customized map and do not mind spending some time working on it.

For me, Google Fusion Table is the middle ground between BatchGeo and MapMe. Google Fusion Table is easy to use. I could create a map after uploading data and pick the right column for the geocoding process. I can also customize my info windows and points, though not as flexibly as MapMe. So if an user is looking for an user-friendly and flexible tool, he or she can choose Google Fusion Table to create a map.